Unlocking the Power of Business Events in Dynamics 365 Finance and Operations
Introduction:
In today’s fast-paced business environment, real-time data and seamless integration between systems are crucial. Dynamics 365 Finance and Operations offers a powerful feature called Business Events that enables external systems to receive notifications and respond to business processes in real-time. This blog post will explore what business events are, how they work, and how you can leverage them to enhance your business operations.
What are Business Events?
Business events in D365F&O are notifications that are triggered by specific actions or changes within the system. These events allow external systems to react to changes in real-time, enabling more efficient and automated workflows. For example, a business event can be triggered when a purchase order is confirmed, a sales order is created, or an invoice is posted.
Implementing Business Events
To implement business events, follow these steps:
1. Identify the Event:
Determine which business process or action will trigger the event. This could be anything from a new customer creation to a payment confirmation.
Lets take a new customer creation as an example for business event. To implement a new business event, you need to build a contract, build the event, and then add code to send the event.
Two classes are implemented for a new event: a business event class and a business event contract class.
Business Event Contract Class
First you will need to create the CreatedCustomerBusinessEventContract class.
[DataContract]
class CreatedCustomerBusinessEventContract extends BusinessEventsContract
{
    protected CustName  customerName; //Add protected variables to hold the contract state.

    // Add parm methods to access the contract state. These methods should be decorated with the DataMember('') and BusinessEventsDataMember('') attributes.
    [
        DataMember('Customer Name'),
        BusinessEventsDataMember('Customer Name')
    ]
    public CustName parmCustName(CustName _customerName = customerName)
    {
        customerName = _customerName;
        return customerName;
    }
    //Add a static constructor method.
    public static CreatedCustomerBusinessEventContract newFromCustTable(CustTable _custTable)
    {
        var contract = new CreatedCustomerBusinessEventContract();
        contract.parmCustName(_custTable.name());
        return contract;
    }
}
Business Event Class
[
    BusinessEvents(classStr(CreatedCustomerBusinessEventContract),
    'Created Customer', // Event Name
    'Created Customer Business Event', // Event Description
    ModuleAxapta::Customer)
]

public class CreatedCustomerBusinessEvent extends BusinessEventsBase
{
    CustTable   custTable;

    // Add public parm methods to maintain the internal state of the class.
    public CustTable parmCustTable(CustTable _custTable = custTable)
    {
        custTable = _custTable;
        return custTable;
    }
    /*
    Add the buildContract method. The method must be decorated with the Wrappable(false) and Replaceable(false) attributes,
    and it will only be called when a business event is enabled for a company.
    */
    [Wrappable(false), Replaceable(false)]
    protected BusinessEventsContract buildContract()
    {
        return  CreatedCustomerBusinessEventContract::newFromCustTable(custTable);
    }
    /*
    Add a static newFrom<my_buffer> method,
    filling in the my_buffer piece with the table buffer that is used to initialize the business event contract.
    */
    static public CreatedCustomerBusinessEvent newFromCustTable(CustTable _custTable)
    {
        CreatedCustomerBusinessEvent businessEvent = new CreatedCustomerBusinessEvent();
        businessEvent.parmCustTable(_custTable);
        return businessEvent;
    }
}
Trigger the Business Event
class CustTable_BusinessEvent_EventHandler
{
    [DataEventHandler(tableStr(CustTable), DataEventType::Inserted)]
    public static void CustTable_onInserted(Common sender, DataEventArgs e)
    {
        CustTable custTable = sender as CustTable;
        CreatedCustomerBusinessEvent::newFromCustTable(custTable).send();
    }
}
2. Configure the Event:
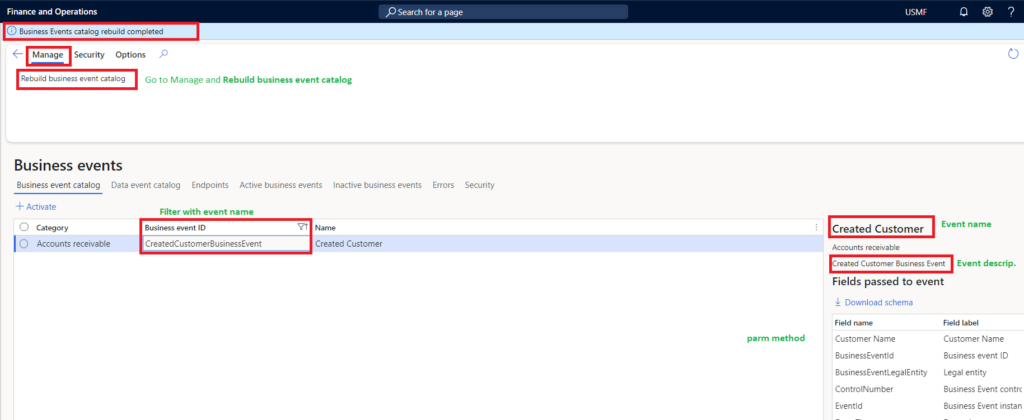
Use the business event catalog to configure and activate the event. Ensure that the event is correctly set up to trigger notifications.
Go to System Administration > Setup > Business events > Business events catalog and rebuild the catalog.

Once catalog rebuild completed, filter your business event and activate it.

3. Subscribe to the Event: Use integration tools like Power Automate or Azure Service Bus to subscribe to the event. This will allow your external systems to receive and handle the event notifications.
4. Test and Validate: Test the event to ensure it triggers correctly and that the external system responds as expected. Validate the entire workflow to ensure seamless integration.
Use Cases for Business Events
Here are some practical use cases for business events in D365F&O:
- Automated Notifications: Send real-time notifications to stakeholders when critical business actions occur, such as order shipments or payment receipts.
- Integration with External Systems: Automatically update external systems like CRM or ERP solutions when key events happen in D365F&O.
- Workflow Automation: Trigger automated workflows in response to business events, such as initiating a restock process when inventory levels drop.
Conclusion
Business events in D365F&O provide a robust mechanism for real-time integration and automation. By leveraging these events, businesses can enhance their operational efficiency, improve data accuracy, and respond swiftly to changes. Whether you’re looking to automate notifications, integrate with external systems, or streamline workflows, business events offer a powerful tool to achieve your goals.
I hope this helps! Feel free to share with others, Happy coding…
Source:
Business events overview – Finance & Operations | Dynamics 365. https://learn.microsoft.com/en-us/dynamics365/fin-ops-core/dev-itpro/business-events/home-page

