Understanding Event Handler Classes in D365F&O
Event handlers in D365F&O are a powerful feature that allows developers to customize and extend the application without modifying the base code. This is crucial for maintaining upgradability and reducing the risk of conflicts during updates.
What are Event Handler Classes?
Event handler classes are special classes in X++ that contain methods designed to respond to specific events in the application. These events can be triggered by various actions, such as creating a record, updating a field, or deleting an entry. By using event handlers, developers can inject custom logic at specific points in the application’s workflow.
Why Use Event Handlers?
-
Maintainability: Event handlers allow you to add custom logic without altering the base code, making it easier to maintain and upgrade the system.
-
Separation of Concerns: They help in keeping the custom logic separate from the core application logic, promoting cleaner and more modular code.
-
Flexibility: Event handlers provide a flexible way to extend the application by responding to specific events, enabling developers to tailor the system to meet unique business requirements.
Types of Event Handlers
In D365F&O, there are two main types of event handlers: Pre-event handlers and Post-event handlers.
Pre-event Handlers
Pre-event handlers are executed before the main event logic. They are typically used to validate data, modify input parameters, or cancel the operation if certain conditions are not met.
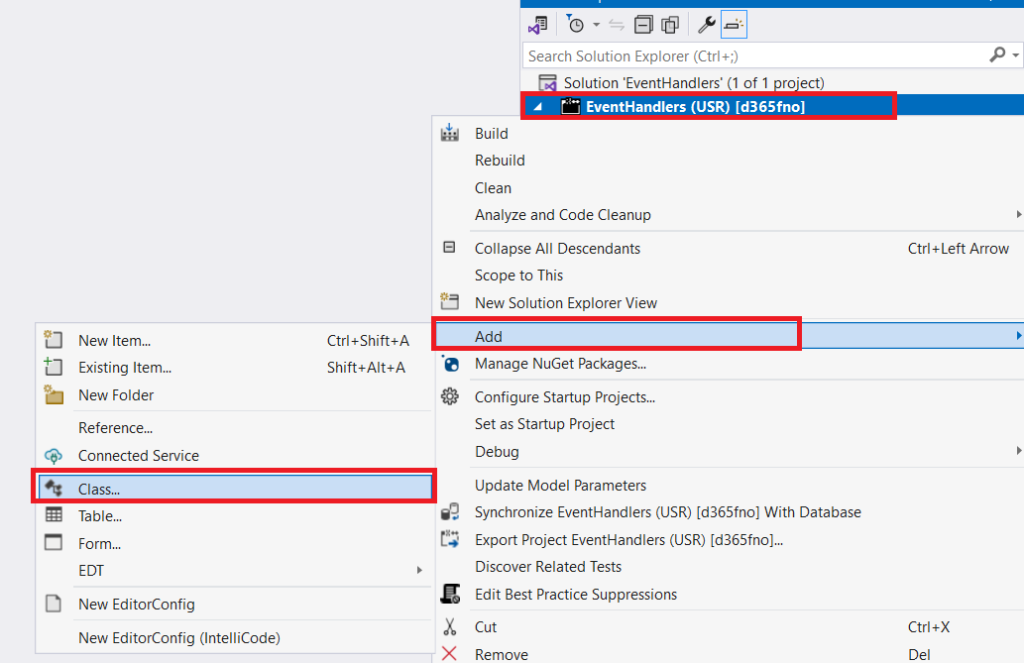
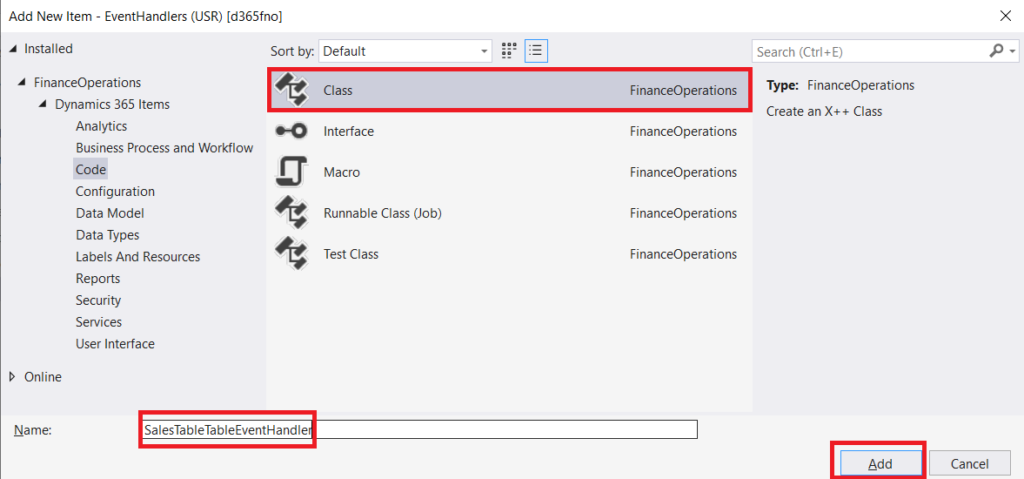
To add a pre-event create a new event handler class. You can add a class to a project from the Solution Explorer window by right clicking the project or activating the context menu and then selecting Add, New item, Code, Class or Add Class.

Enter a descriptive name for the pre-event class, such as SalesTableTableEventHandler. It’s best practice to use the object name as a starting point, such as SalesTable, and then add the object type, such as Table, because SalesTable could be a table or a form. Then, you can append it with EventHandler. For example, you could have two event handler classes that are named SalesTableTableEventHandler and SalesTableFormEventHandler.

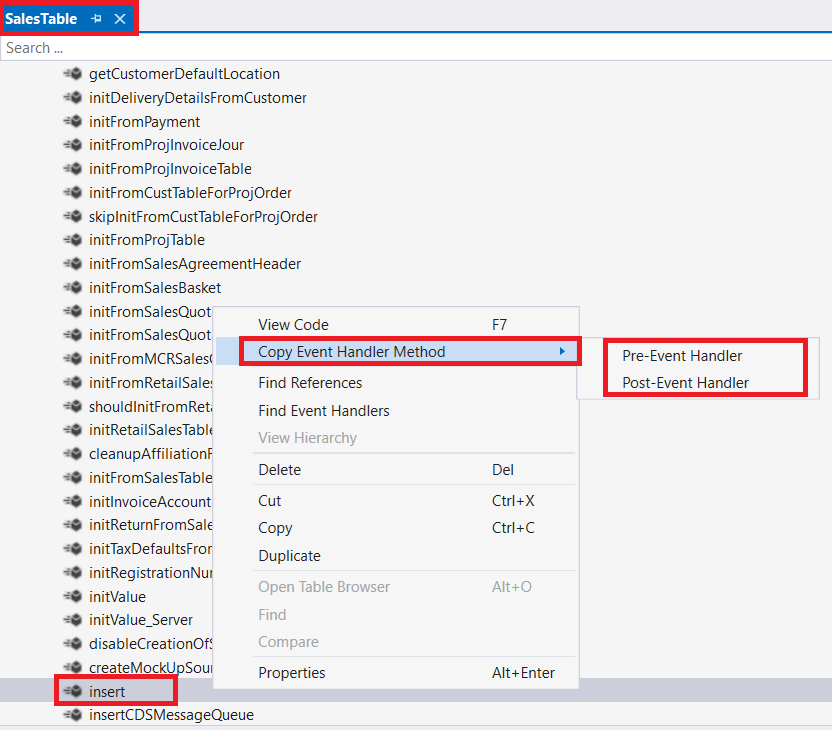
To add a pre-event or post-event, make sure that the method that’s in the event handler class is discoverable. On the method, right-click or activate the context menu, select Copy event handler method, and then select Pre-event handler, as the following image depicts.

Pre-event Handlers Implementation
Pre-event handlers are executed before the main event logic. They are typically used to validate data, modify input parameters, or cancel the operation if certain conditions are not met.
internal final class SalesTableTableEventHandler
{
    /// <summary>
    ///
    /// </summary>
    /// <param name="args"></param>
    [PreHandlerFor(tableStr(SalesTable), tableMethodStr(SalesTable, insert))]
    public static void SalesTable_Pre_insert(XppPrePostArgs args)
    {
        SalesTable salesTable = args.getThis() as SalesTable;
        // Custom logic before the insert operation
        if (salesTable.CustAccount == "")
        {
            throw error("Customer account cannot be empty.");
        }
    }
}
In this example, the SalesTable_Pre_Insert method is executed before the insert method of the SalesTable class. It checks if the CustAccount field is empty and throws an error if it is, preventing the insert operation.
Post-event Handlers Implementation
Post-event handlers are executed after the main event logic. They are used to perform actions that should occur after the event has completed, such as updating related records, logging changes, or sending notifications.
internal final class SalesTableTableEventHandler
{
    /// <summary>
    ///
    /// </summary>
    /// <param name="args"></param>
    [PostHandlerFor(tableStr(SalesTable), tableMethodStr(SalesTable, insert))]
    public static void SalesTable_Post_insert(XppPrePostArgs args)
    {
        SalesTable salesTable = args.getThis() as SalesTable;
        // Custom logic after the insert operation
        info(strFmt("Sales order %1 has been created.", salesTable.SalesId));
    }
}
In this example, the SalesTable_Post_Insert method is executed after the insert method of the SalesTable class. It logs a message indicating that a new sales order has been created.
Conclusion
Event handlers in D365F&O provide a robust mechanism for extending and customizing the application without modifying the base code. By using pre-event and post-event handlers, developers can inject custom logic at specific points in the application’s workflow, ensuring maintainability, flexibility, and separation of concerns.
I hope this helps! Feel free to share with others, Happy coding…
Source:
Create pre-event and post-event handler classes – Finance & Operations | Dynamics 365. https://learn.microsoft.com/en-us/training/modules/explore-extensions-framework-finance-operations/pre-event-post-event-handlers?ns-enrollment-type=learningpath&ns-enrollment-id=learn-dynamics.extending-dynamics-365-finance-operations

